
Dead Bug: Muscles Worked and Best Alternatives
Learn which muscles the dead bug trains (primary vs secondary), where it fits in a program, and 4 practical alternatives with when to pick each.
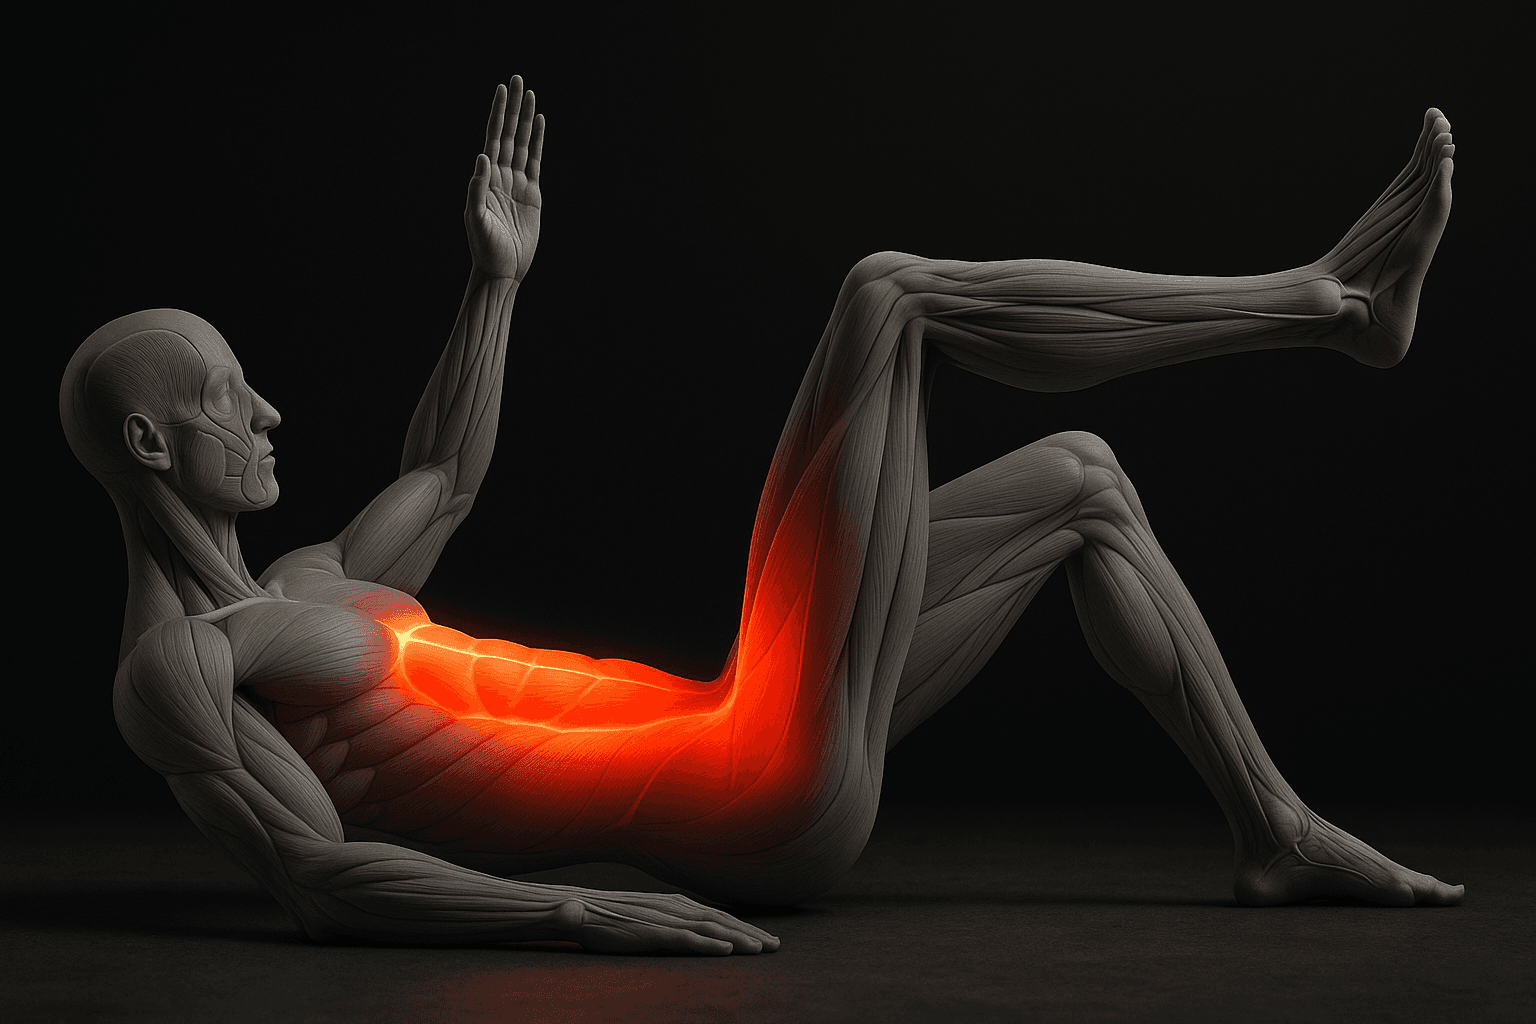
Photo by RepBro.
The dead bug primarily trains the deep core stabilizers—especially the transversus abdominis and the internal obliques—plus the rectus abdominis and hip flexors as secondary movers; it’s mainly a stability exercise for anti-extension/anti-rotation control rather than a maximal strength or hypertrophy move.
What muscles does the dead bug train?
Primary muscles
- Transversus abdominis: creates a corset-like stabilization around the spine.
- Internal obliques: coordinate with the transversus to control pelvic and ribcage position.
Secondary muscles
- Rectus abdominis: resists lumbar extension during limb movement.
- Hip flexors (iliopsoas, rectus femoris): active when legs move.
- Shoulder stabilizers (rotator cuff, scapular muscles): if you extend arms overhead during the drill.
- Multifidus and erector spinae: work isometricly to maintain spinal alignment.
The dead bug is mainly an anti-extension and coordination exercise that teaches the nervous system to dissociate limb movement from axial (spine) movement. It’s low-load and high-control by design.
Where does the dead bug fit in a program?
- Use it in warm-ups, core circuits, or early in a session for motor control work. Place it before heavy loading of squats, deadlifts, or overhead presses if you need better pre-activation of the trunk.
- Frequency: 2–4 times weekly for maintenance or motor learning; daily short practice (30–90 seconds) is fine if you're working on technique.
- Dose: 2–4 sets of 8–16 slow controlled reps per side, or 20–60 second holds in progression. Rest 30–90 seconds between sets depending on intensity.
- Progression ladder: basic dead bug (arms only) → legs added → opposite arm/leg → added load (light ankle weights or resistance band) → anti-rotation progressions.
Use it when the goal is improving core coordination, reducing unwanted lumbar motion under limb load, or teaching breathing with bracing. It’s not a primary exercise for increasing maximal trunk strength or building muscle mass.
How do I perform the dead bug safely?
Basic setup and cueing
- Lie on your back, hips and knees at 90° (tabletop), arms pointing toward the ceiling.
- Gently flatten your lower back into the floor without breath-holding—exhale slightly while maintaining tension.
- Slowly lower one arm overhead while simultaneously extending the opposite leg toward the floor. Move until you feel the lumbar spine start to lose contact, then stop and return.
- Repeat for the other side.
Tempo and targets: 2–3 seconds to lower, 1 second pause, 2 seconds to return. Aim for 8–16 reps per side.
Safety note: Stop on sharp pain, and consult a qualified professional if you have persistent or acute back pain. Keep movements controlled—don’t force full range if your lumbar spine lifts off the floor.
What are the best alternatives and when to pick each?
Choose an alternative based on equipment, injury constraints, and the specific training deficit you’re addressing.
- Bird Dog — best for minimal equipment and back-friendly hip control
- What it trains: glutes, erector spinae, multifidus, and core anti-rotation control.
- When to pick: no equipment, after acute abdominal surgery when supine drills are uncomfortable, or when you need more posterior chain engagement.
- Parameters: 2–4 sets of 6–12 reps per side, 2–3 second holds at full extension.
- Why choose it: easier to keep the lumbar spine neutral since you’re on hands and knees; also trains contralateral coordination similar to dead bug.
- Pallof Press — best for anti-rotation strength and progression for plateaus
- What it trains: obliques, transverse abdominis, lats and shoulder stabilizers via anti-rotation demand.
- When to pick: you hit a dead bug plateau (excellent control but weak resistance), or you want a progressive, measurable external load. Also useful if you have limited hip mobility.
- Equipment: resistance band or cable machine.
- Parameters: 2–4 sets of 6–12 reps per side, 2–5 second holds at full press for tempo emphasis.
- Why choose it: scales easily by increasing band tension or cable weight and transfers well to standing, anti-rotation demands in sport.
- Hollow Hold / Hollow Rock — best for progressive overload and abdominal endurance
- What it trains: rectus abdominis, transverse abdominis, hip flexors; high demand on anterior core.
- When to pick: you want higher intensity core endurance or a gymnastic-style progression after mastering the dead bug. Avoid if you have acute hip flexor tendinopathy.
- Equipment: none.
- Parameters: start with 3 × 10–20 second holds for hollow hold; progress to rocking and 30–60 second holds.
- Why choose it: it overloads anterior core more than dead bug and is great for conditioning and bodyline control.
- Stir-the-Pot on Stability Ball — best for shoulder/core integration and progression for proprioception
- What it trains: rectus and obliques, transverse abdominis, rotator cuff, and scapular stabilizers.
- When to pick: you need to overload anti-extension with added instability after mastering floor progressions, or want a movement that challenges shoulders and core together.
- Equipment: stability ball and possibly a mat.
- Parameters: 2–4 sets of 20–40 seconds circling motions; start with small circles.
- Why choose it: adds proprioceptive demand and is scalable by circle size or tempo.
How do I choose between these exercises?
- Use dead bug when your priority is teaching low-load, limb-to-trunk dissociation and you can maintain a neutral lumbar spine.
- Use bird dog if supine position is uncomfortable or you want more posterior chain emphasis.
- Use Pallof press when you need measurable external loading and anti-rotation strength.
- Use hollow hold if you need higher anterior core endurance and can tolerate hip flexor load.
- Use stir-the-pot when you want integrated shoulder–core stability under instability.
If you track sessions, you can log progress with sets, reps, hold times, and perceived exertion. For app-based tracking and guided routines, consider RepBro for templates and comparisons; if you want to compare exercises side-by-side, see this comparison page: https://www.repbro.app/vs
One-sentence takeaway: The dead bug is a high-value, low-load stability exercise that targets deep core stabilizers and should be complemented by bird dog, Pallof presses, hollow holds, or stability-ball work depending on equipment, injury status, and progression needs.
Frequently asked questions
- Is the dead bug good for lower back pain?
- The dead bug trains deep core stabilizers that often support spinal control, but it's not a treatment. Stop if it increases sharp pain and check with a clinician before using it as rehab.
- How many reps and sets are appropriate?
- Use 2–4 sets of 8–16 slow, controlled reps per side (or 20–60 seconds holds for progressions). Prioritize control over volume and avoid fast, sloppy reps.
- Can beginners do the dead bug?
- Yes. Start with bent-knee single-leg progressions or arms-only versions until you can maintain a neutral lumbar spine for 10–20 seconds.


